This blog is my personal space. Do not confuse this with statements or opinions on behalf of any employer I have ever had, have now, or will ever have in the future.
Yup … I was there on 28 September 2011 and was quite impressed by Daltrey and his superb band … Tommy sounded great!
This is the first installment … I plan on processing the images once I get some time, but meanwhile here is a 1 hour and 9 minute presentation of the entire rock opera minus a 20 second battery change.
I had to record this in stealth mode because I already had the tap on the shoulder from “the man” … so I jammed the camera into my belly and shot through the guard rail, which of course satisfies the Scotiabank Center’s desire to screw up every bit of fun the patrons can have with a camera :-)
If you listen carefully, you’ll even hear a couple of clever additions to the rock opera … I quite like it when he ad libs a bit …
For what it is, I am very pleased with the quality of the video, and especially the sound. I mastered this in a trial version of Sony Vegas Platinum HD and I definitely plan to buy it. What a wonderfully professional piece of software! The audio adjustments alone are worth the price. I also added some slight sharpening and some gamma increase, which opened the shadows more than the Fuji likes to do …
Update: Wow … a few hours later and Time Warner has identified this work as their copyrighted material. I guess I did a pretty decent job of mastering it. But I disputed it immediately because it is obviously not their material unless they have suddenly developed a penchant for recording from the second level of an arena on a compact camera through a guard rail … sheesh …
I got interested in the J1 when I realized that the new Nikon 1 system will provide some hefty magnification for those situations where the ultimate in low light image quality is not required. Examples include shooting birds or other wildlife and shooting performers on stage ay outdoor concerts. Reach really matters in these instances.
What makes the Nikon 1 system really special is the combination of a small, but not too small sensor and the promise of an F mount adapter for AFS lenses. Wow … that just rocks!
For example, my trusty 70-300VR lens is very sharp in middle at all focal lengths, and with the Nikon 1 crop factor of 2.7, the weakest part of the lens does not come anywhere near the image. The only issue left to be answered will be whether it can handle the pixel density of the Nikon 1 sensor.
So how difficult will this be? Let’s first examine the sensor size differences at play …
You will note that the 4/3” sensor is missing … I added the G3 as an afterthought and forgot to include it here. DPReview’s sensor sizes database shows the size of the 4/3” sensor as 18x13.5mm, so it slots nicely in between the 1” of the J1 and the Nikon APS-C sensor sizes, as expected.
Now, this is not a review of these cameras. And it is not an exhaustive analysis either. In fact, I plan to analyze one set of crops form imaging-resource.com in order to judge how these sensor sizes will do in tough situations.
When shooting birds in the woods, for example, ISO must often be raised to get decent shutter speeds, especially when shooting consumer glass at f/5.6 at maximum zoom. In such situations, bridge cameras and other cameras with so-called pinhead sensors really start to come apart. There just is not enough light gathering ability to maintain details at 800 ISO and above (and when you go into the woods, you will be shooting around there if you want decent shutter speeds.)
The APS-C sensor is a very good compromise these days for wildlife shooters. You get very nice high ISO performance and you gets lots of reach on the same lenses you might have shot years ago on film. This is, of course, for Nikon and Pentax users mainly. Canon cut of their users in the mid-80s with a totally new mount. And the others are all gone from that era.
Anyway, 4/3” is really starting to challenge these days because of improvements in sensor efficiency etc. Of course, all sensors benefit form such improvements, so APS-C and full frame continue to maintain their traditional lead in image quality. But as they all cross certain thresholds, the smaller sensors become applicable to more and more shooting situations.
Before I go on, let’s have a look at the one image that more or less covers the issues for me. This is a 1600 ISO image set from imaging-resource, as mentioned previously. Of course, imaging-resource.com maintains all copyrights for the original images, none of which are shown here. But this is the set of crops … please click on the crops to see them in full size. Otherwise, you will just have to take my word for it.
So, starting from the top. The D3100 has the largest sensor and moderate resolution at 14mp. This is a fine performance for an APS-C sensor of a recent, but not the very latest generation of technologies. It does not, for example, benefit from the dramatic improvements in dynamic range that the D5100, D7000 and K5 all share.
But it still acquits itself very well here. The hair looks very much like hair, with a stranded appearance and minimal (but not zero) clumping apparent. The eye looks detailed with the eyebrow giving a good impression of texture. The sleeve shows good texture in light and shadow, despite depth of field putting the sleeve slightly out of the focus zone. The numbers on the watch face are all clear and everything has a nice, rounded 3-dimensional feel to it.
The G3 is a real dark horse here. Panasonic have been really improving their jpeg engines lately, with the GH2 being the last one that really impressed me. Here, the Panny shows very nice fine details. Some people will prefer this image over the D3100, and it is hard to disagree. But, of course, I will anyway :-)
What I don’t like about the G3 image is the hair clumping. This is common as borscht as sensor size falls. The noise builds to a point where noise reduction must smear out very fine detail like the lines between the hairs in order to get a decent image. Panny do it as well as anyone, but the laws of physics are not to be denied. The eye, on the other hand, is magnificent. The extra resolution really helps here as does their wonderful sharpening. Nikon are known to favor weak sharpening, which allows for more after the fact processing, but anyone who likes their images out of camera will favor the G3 over the D3100.
The sleeve looks superb. The extra depth of the focus field on the smaller sensor really helps it, as does the higher sharpening. This is a great performance. One could do far worse.
Now … the J1. This is the one I am personally interested in as I might be able to treat my 18-200VR and 70-300VR as the equivalent of a Bigma and an even bigger zoom … so how does this new 1” sensor stack up?
Well, at 1600 ISO, I think it looks a bit more like a compact camera than it does like a dSLR. The G3 looks like a dSLR (excepting the clumping) but this one looks like a better compact camera. Note, though, that I shoot my F550EXR in RAW only and I would shoot the J1 that way too. I will take a crack at the NEFs on the site when Adobe release the next ACR update.
Meanwhile, the hair is a bit mottled looking, which means that they are struggling to handle the chroma noise in this lighting. But there is still pretty good texture. The eyebrow looks good, though as does the eye. The low-ish resolution hurts the eyelash resolution, but it will look good in almost any web or small print output form. The sleeve is very nice. A strong hint of texture on the fabric and the watch face remains quite legible.
Moving on to the two compacts and the clumping is nearly complete at this point. Both show almost no hair texture and both have subtle mottling, although they hold it together very well. The LX5 does a slightly better job of the eye, but both suffer even when compared to the J1. Which is expected as we’ve taken another drop in sensor size.
There is little texture left in the fabric and the LX5 really smears out the threads, which remain quite legible in the J1 and mostly legible in the G12 image. The G12 watch face is only a bit down in legibility from the J1, but the LX5 watch face does not look very good.
I would have to say that, were I to shoot any of these smaller sensors, I would be shooting only RAW. The jpegs are not all that detailed.
So … my bottom line: Clearly, the 4/3 and APS-C sensors kind of stomp the smaller ones. But that should be expected. There is, however, a clear drop in image quality at each step, despite the Panny’s excellent showing. So you must be willing to step up your game if you want to try to obtain the results you can get from your dSLR with one of these smaller sensors.
I find that I can do really well with the F550EXR, a 1/2” sensor long zoom compact, but only if I shoot and process RAW. That is exactly how I would treat the J1, which means that I will have to give one a try one day. That crop factor would be a joy to use under certain circumstances.
An interesting argument broke out over the last few days on a forum on DPReview. The whole thing started when someone posted a comment that the 2.7x crop factor of the new Nikon 1 system provides some serious crop magnification so that, when the new adapter for F Mount lenses arrives, we be able to carry the equivalent of a Bigma (Sigma’s 50-500 lens) in a small bag. Wow …
I had not spent any time pondering that because the camera is not compact enough to be useful as a concert cam (or is it … hmmmm) and therefore it’s real value is as an enthusiast’s replacement for a dSLR. Well … perhaps I did not think that through.
I own the D7000 and the 18-200VR and 70-300VR along with a selection of primes and a few other zooms. I will be reshaping this over time, but for now it suffices. Imagine, though, that I felt like birding in a place where I could not get all that close to the birds. Bigmas are quite suitable for that because on a 1.5x crop like the D7000 they give a nice effective 750mm focal length.
So with the Nikon 1, my 70-300VR suddenly gives me a field of view to match a 190-810mm lens in a much smaller package than the Bigma. Now that’s quite interesting … if one carries a Nikon 1 in the bag, one is always ready to get some pretty amazing reach, providing that the light is adequate. And note that the Nikon 1 is showing serious promise with sample images being quite clean at 6400 ISO … it gets better and better.
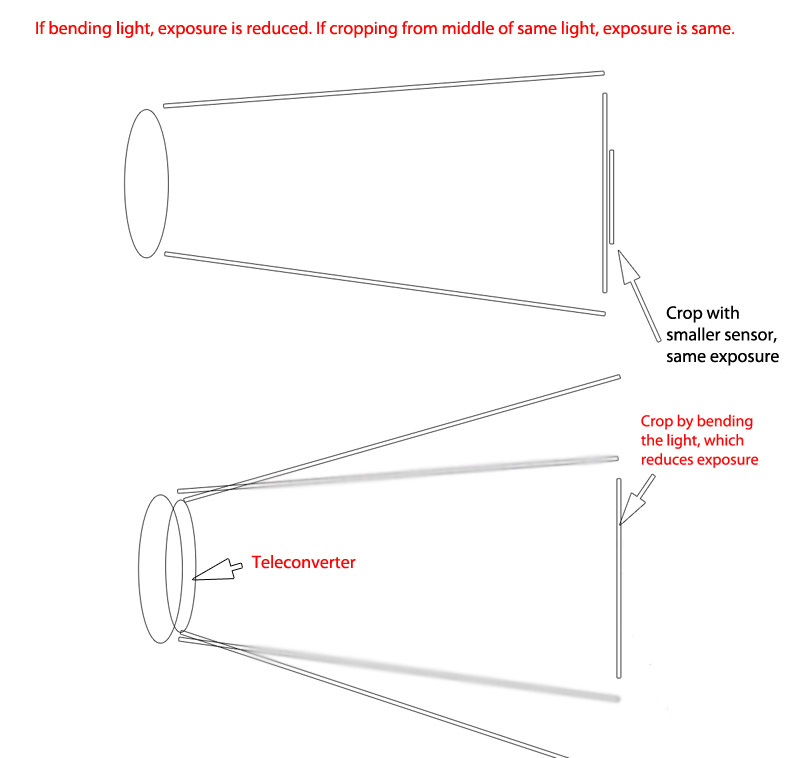
Now, back to the argument. One person in particular is pushing the idea that the crop of the Nikon 1 is the same as if you had attached a teleconverter to a camera to achieve the same field of view on the same lens. Thus, he suggests (rather stridently in fact) that the aperture must be multiplied for more than just the depth of field effects (which is always true.)
Well, he’s made a complete hash of the argument because in fact no such effect exists. You multiply the aperture to see what sort of depth of field in full frame terms you can expect. So shooting at f/5.6 on a 2.7x crop factor means that your depth of field will be approximately equivalent to that achieved on a fill frame camera at f/15. Of course, the magnification is so strong by this point that there is plenty of subject isolation anyway.
But when we try to apply this to the noise generated by the exposure shift, the argument hits a wall. What follows is my analysis of the differences … please let me know in the comments if you find a fundamental error.
So … when you draw it out, things start to get a whole lot clearer. Here we have the identical lens on the identical system, let’s presume an F mount or EF mount … it really doesn’t matter, so long as we change only one thing in each case to achieve our crop to the new field of view.
In the top case, all we did was to insert a smaller sensor in place of the larger sensor. Basically, take a D3 body and place an APS-C sensor inside it in place of the FF sensor it came with. That would give you the moral equivalent of a D2Hs. In fact, both would be 12mp sensors, giving you the same effective quantization as well.
Now, what have you done? The amount and density of the light is the same (aperture has not changed.) Therefore, you are merely cropping the middle out of the frame, exactly as if you had captured the same image on a larger sensor and then cropped that image to the same dimensions. In other words, the aperture and exposure are the same, so the noise will be the same in that portion of the image …
The bottom case is very different. Here, you have inserted a teleconverter to magnify the image and therefore crop using the original sensor in place. Thus, you have spread the light to make it cover a larger image circle. You have therefore reduced the light density and therefore reduced the effective aperture, since nothing else has changed.
So the exposure must be rebalanced by slowing the shutter or increasing ISO. If you increase ISO, you are adding more noise to this portion of the image.
There is really nothing similar about these two cases except for the fact that you can match the field of view. The light density received across the whole image is quite different, so the exposure will be different.
Bottom line: When mounting a full frame 50mm 1.8 lens on an APS-C camera, you still get full value for the f/1.8 aperture despite the narrower field of view.
Edit:
Here is another way to think about this “dilution of light density” concept … take a magnifying glass and hold in such a way that it concentrates sunlight in a tight circle. Point the light at a piece of paper. What happens? Almost anyone knows that answer … fire and a hole in the paper.
Now, reverse the lens to spread the light out instead. What happens? Nothing. The light is much less dense and there are far fewer photons hitting any one area of the paper. It would take all the time in the world to set fire to the paper with the light spread out.
That’s all a teleconverter does. Spreads the light out to cover a larger area. Hence, it takes more time to capture the same number of photons in each pixel.
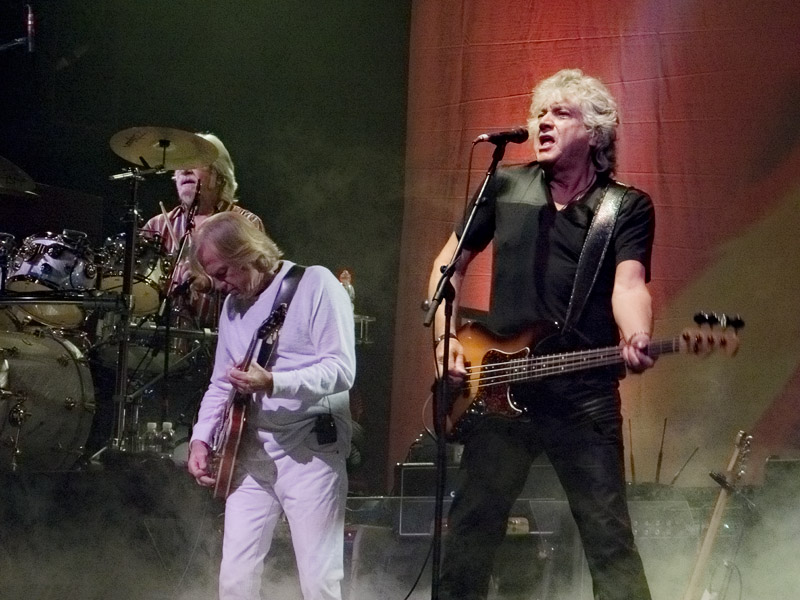
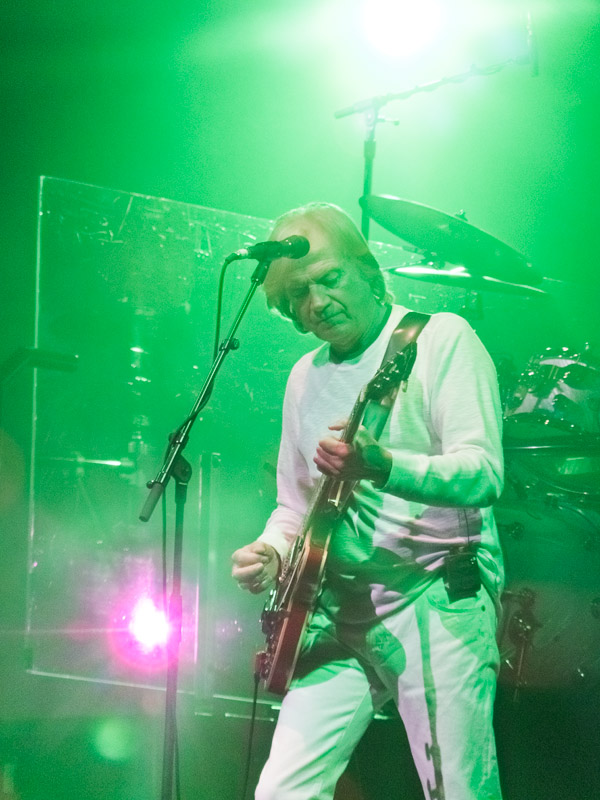
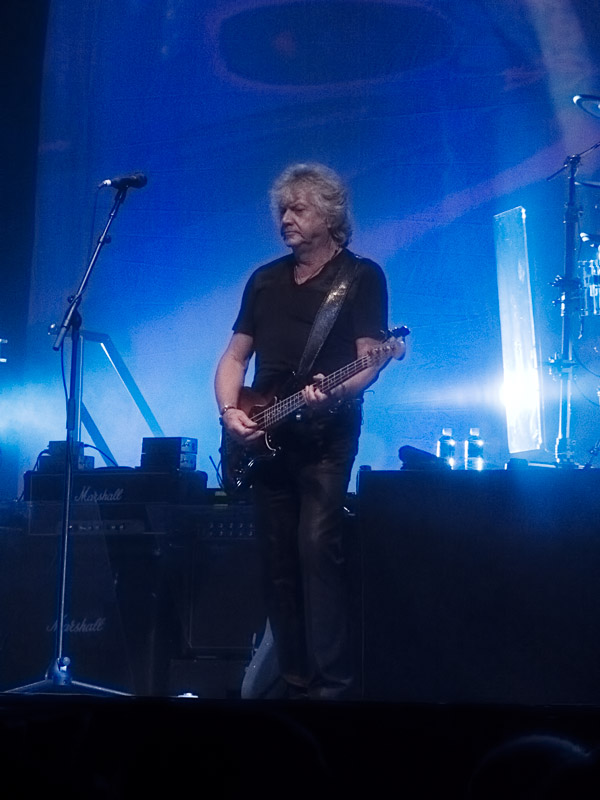
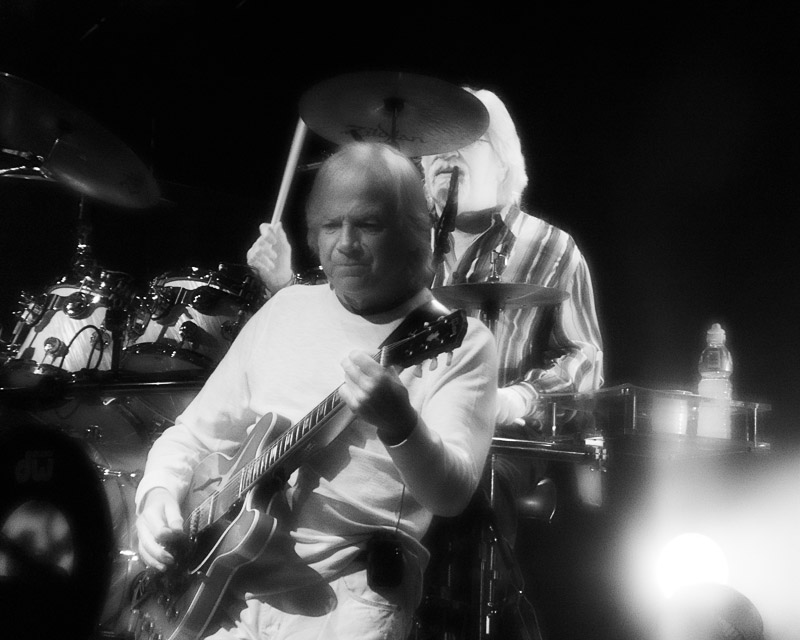
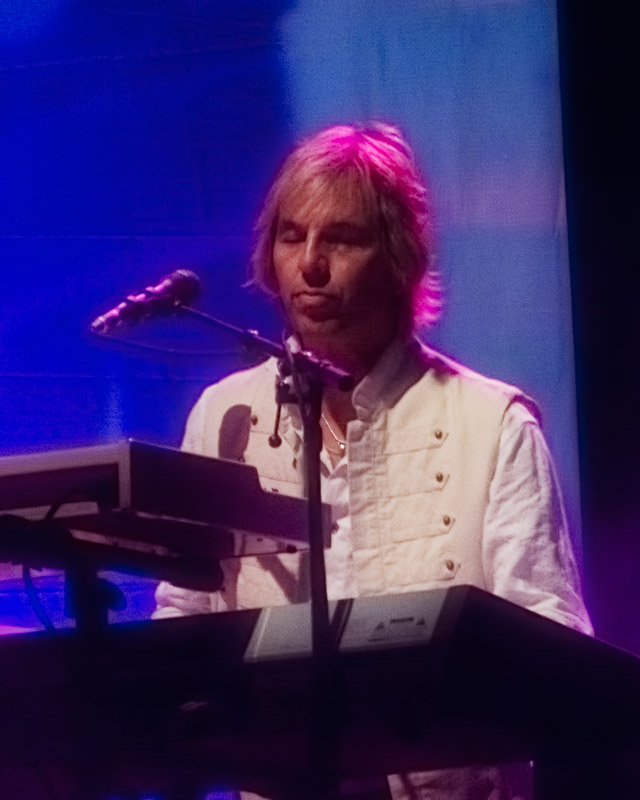
Scotiabank Place was host to the Moody Blues on Thursday evening. They are one of the bands that started the progressive rock genre in the 60s. In fact, this concert occurs about 44 years after they released the seminal Days of Future Past, an album that continues to shine as a beacon of that style.
Karen sent me a link to the Ottawa Citizen’s review of the concert and I was surprised that they displayed a snarky edge towards the band. It moves back and forth from complements like “Guitarist Justin Hayward still rocks out with feeling” to unpleasant digs like “The band took a break after 10 songs, possibly for a nap” …
I for one had never seen them live before, even though I had bought 8 straight albums starting at Days of Future Past as a teenager. The opportunity to see them live was thus an absolute gift from my perspective. Although I am a bit upset at the Citizen for reporting so harshly, I am even more upset at my city for insulting the band with an anemic 2,000 fans at this concert. My guess is that they will give us a well-deserved miss on the next tour, although I hope not …
So … back to the concert …
I have a memory like a sieve any more, so I cannot recall the set list, but setlist.fm has the set list for the Halifax stop on the same tour and inspecting it leads me to believe that they are maintaining a pretty rigid set list on this tour … but a great one. Here’s a copy of the set list:
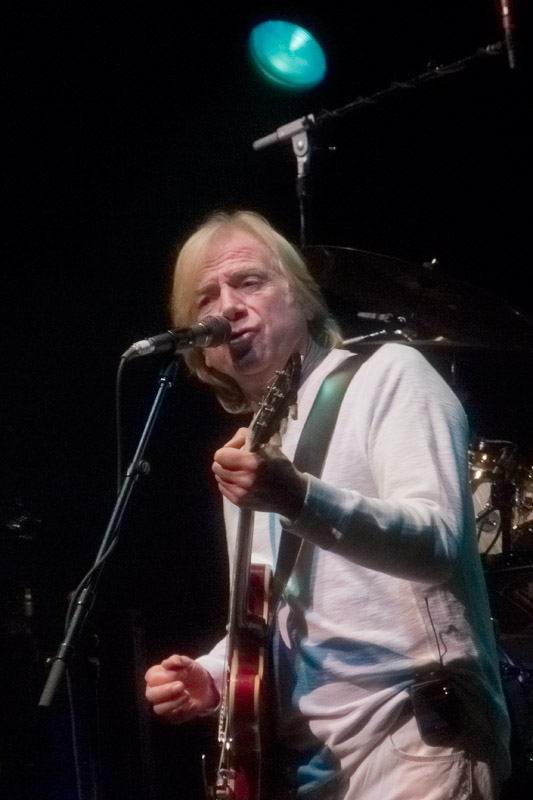
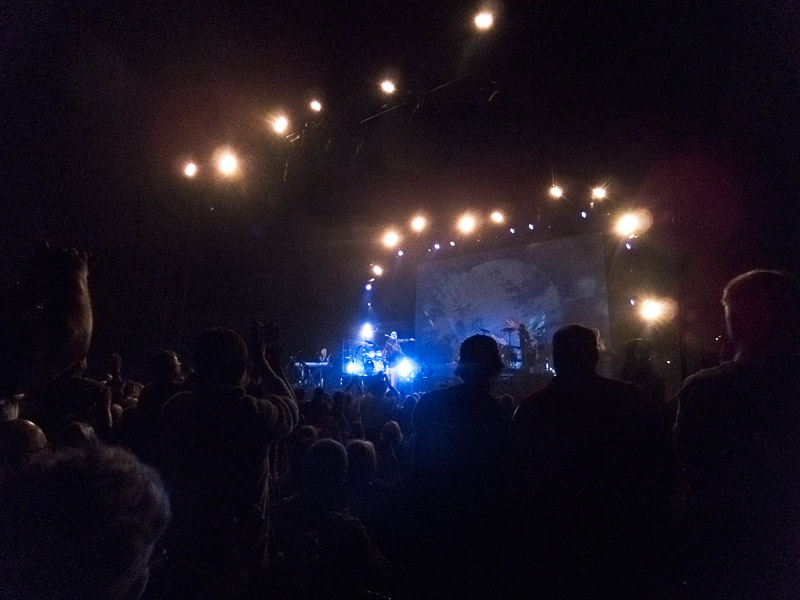
The stage itself is nicely decked out. They project some very nice graphics during the show, including a pretty wild trip through worm-hole-like tunnels for the song “Question.” Here is the view from the 8th row stage right where Karen and I were seated.
F550EXR 3200 ISO, f/4.1, 1/25s
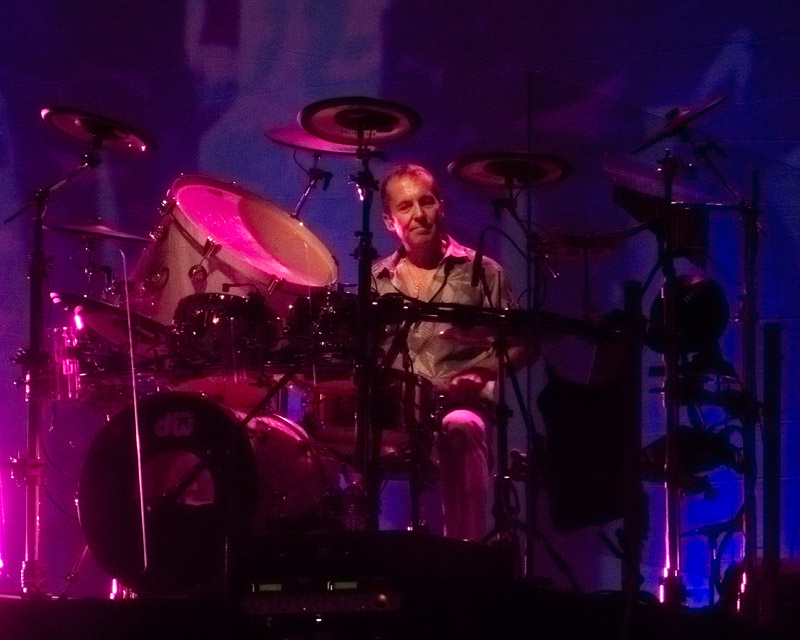
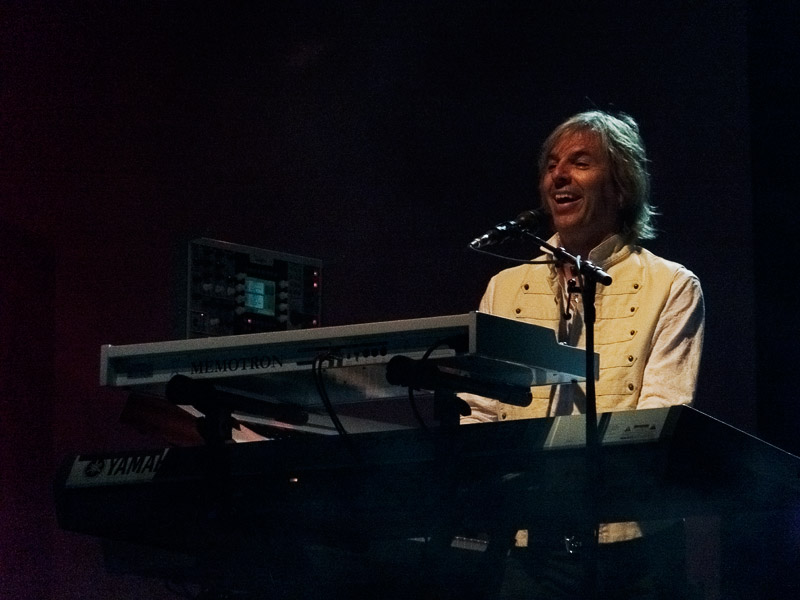
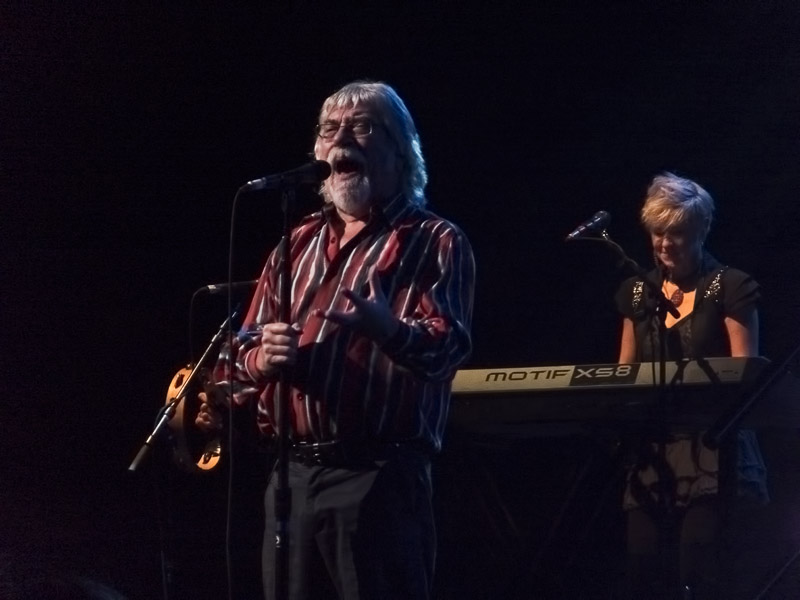
Since Michael Pinder and Ray Thomas are retired, the band travels with a quartet of excellent musicians to fill the band out. Here is what the Citizen said about the quartet …
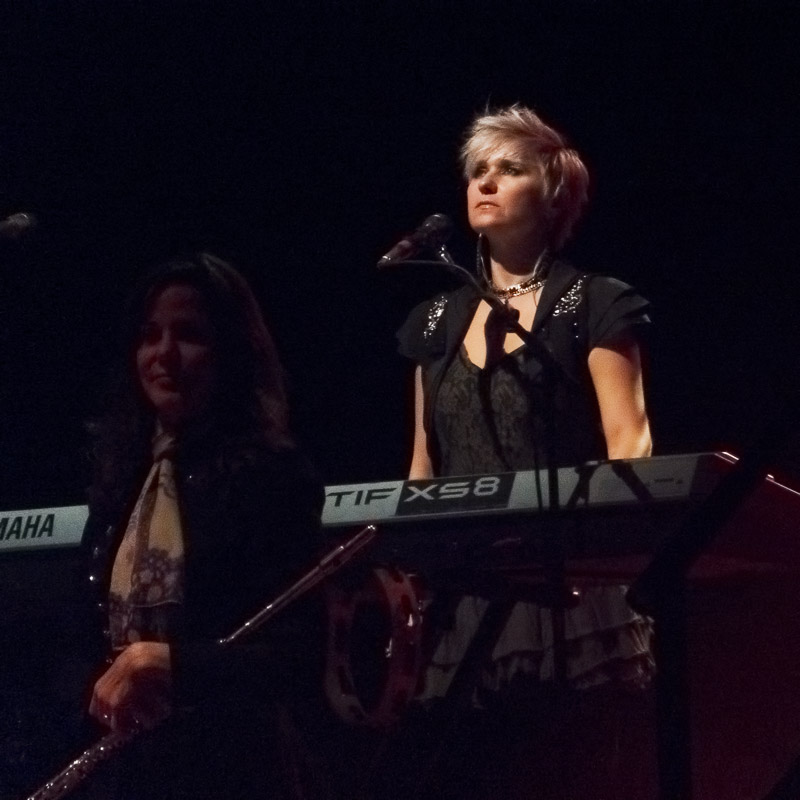
The trio's sound was filled out by a crack quartet - second drummer Gordon Marshall, Alan Hewitt on keyboards, Norda Mullen on flute and guitar and Julie Ragins on keyboard, guitar and vocals. The additional musicians created a wall of sound so that Peak Hour was a slab of strobe-lit psychedelic pyrotechnics.
I captured about 95% of The Voicebut received a tap on the shoulder and an admonition that there is no video recording allowed in the ScotiaBank Center. What a joke … as if anyone cares about all the myriad mediocre compact camera videos floating around on YouTube. The bands should be happy to get the free advertising … anyway, here it is as recorded by the Panasonic ZS3. The ZS3 does a very nice job in my opinion.
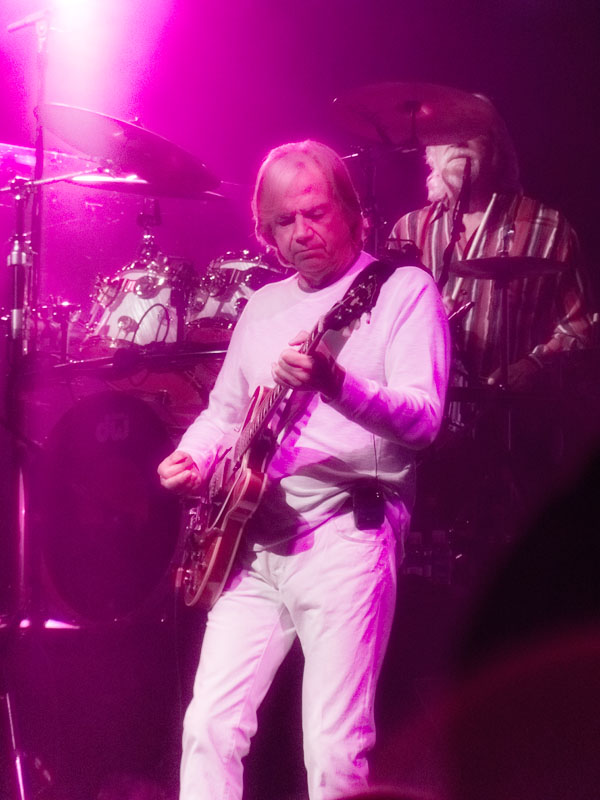
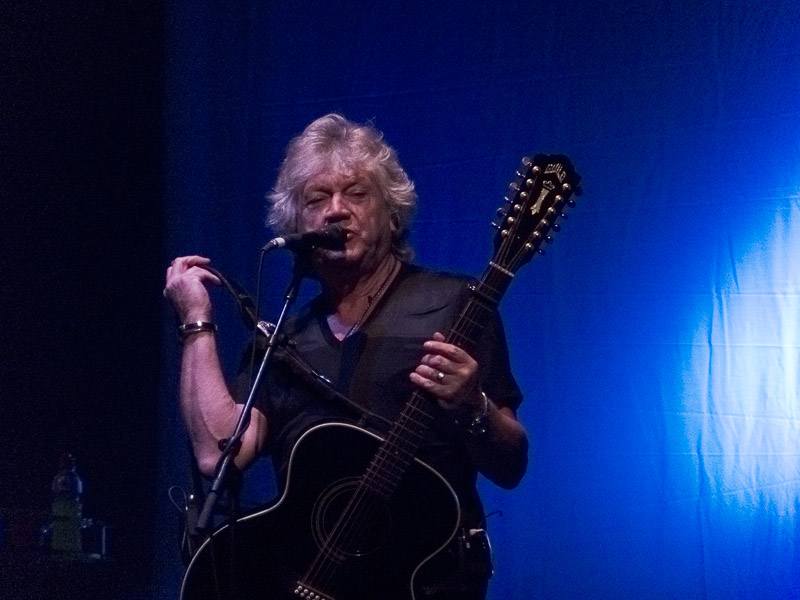
Justin Hayward played the intro to one of the following songs, and that’s the only time I saw him play anything but keyboards.
F550EXR 2500ISO, f/5.3, 1/60s
At this point I realized two things … the exposures were two slow, which was risking sharpness and blowouts, and RAW+jpg was eating space for no reason. I never process the jpegs anyway, as the RAW is invariably superior in tone.
So I switched the camera to RAW only and manual mode, where I basically bounced back and forth between 1600ISO and 3200ISO and shot from 1/160s through 1/200s to gain extra sharpness at the long end.
I shot most of the concert in AF center mode, and I added face detect for the latter half. I think it helps off and on and is worth trying at concerts. Multi AF is a waste of time as it is no better at locking on.
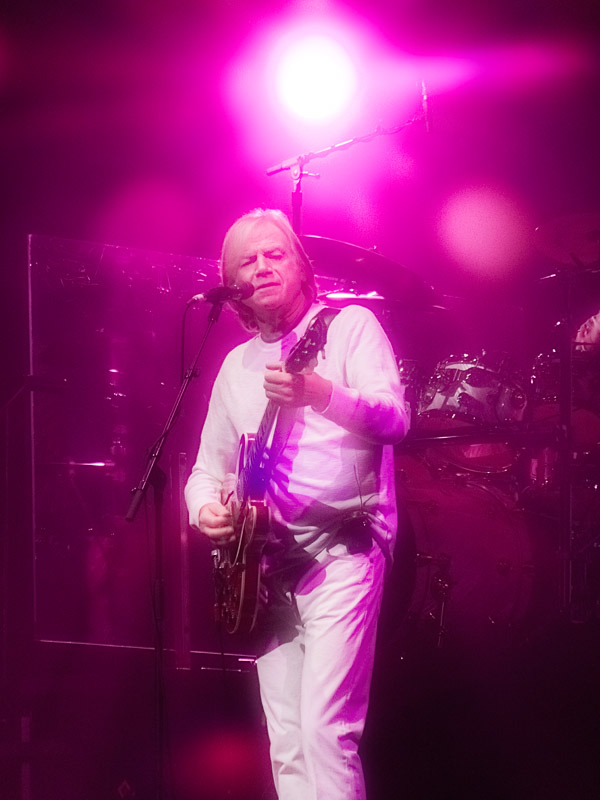
I found the clarity of the images from the F550 to be excellent. Fine hair like Justin Hayward’s shows up with a surprising amount of texture, even at 3200 ISO. This is a combination of Fuji’s excellent sensor and the rather bright lighting on the performers. But it works better than with any of the previous EXR cameras. I include the F200 in that comment since it not only has less than half the reach of the F550 but also has no RAW. So it is pretty much hamstrung for the kind of shooting I enjoy at a concert.
Here’s Hayward early on …
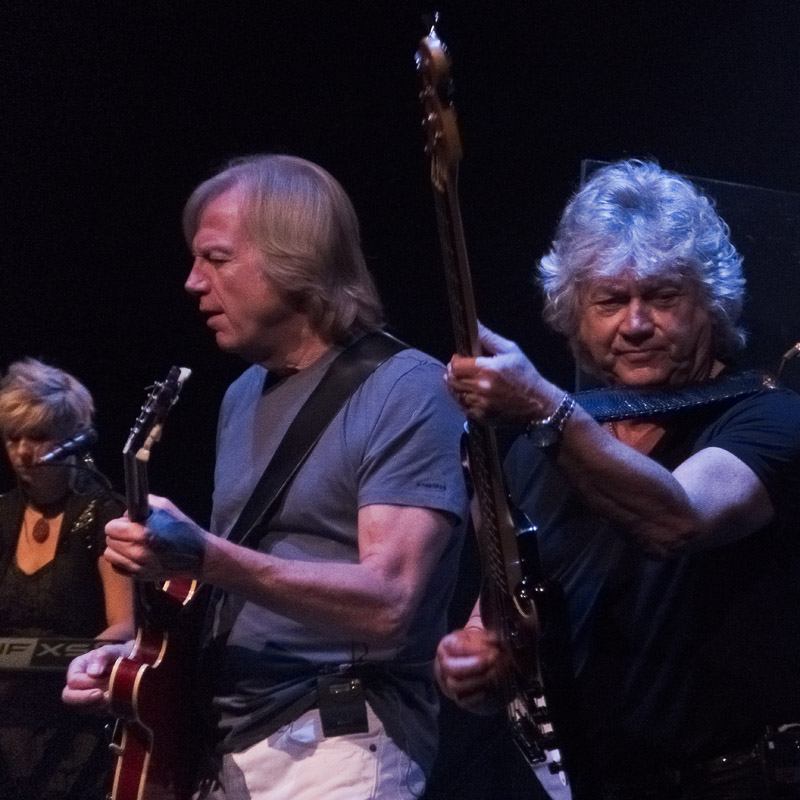
A nice shot of the band … that looks like the cover of Threshold in the background …
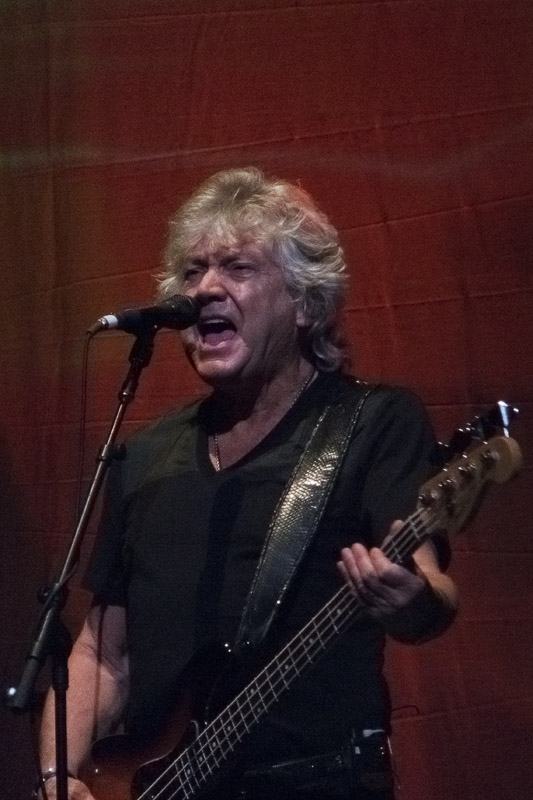
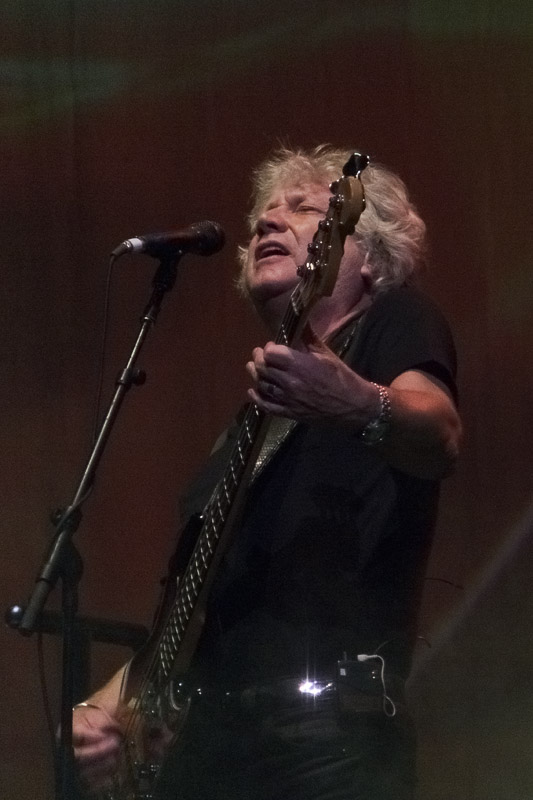
Some of the images I got have astounding sharpness, especially considering the distance and ISO settings … this one of John Lodge is an example of how sharp this cam can get …
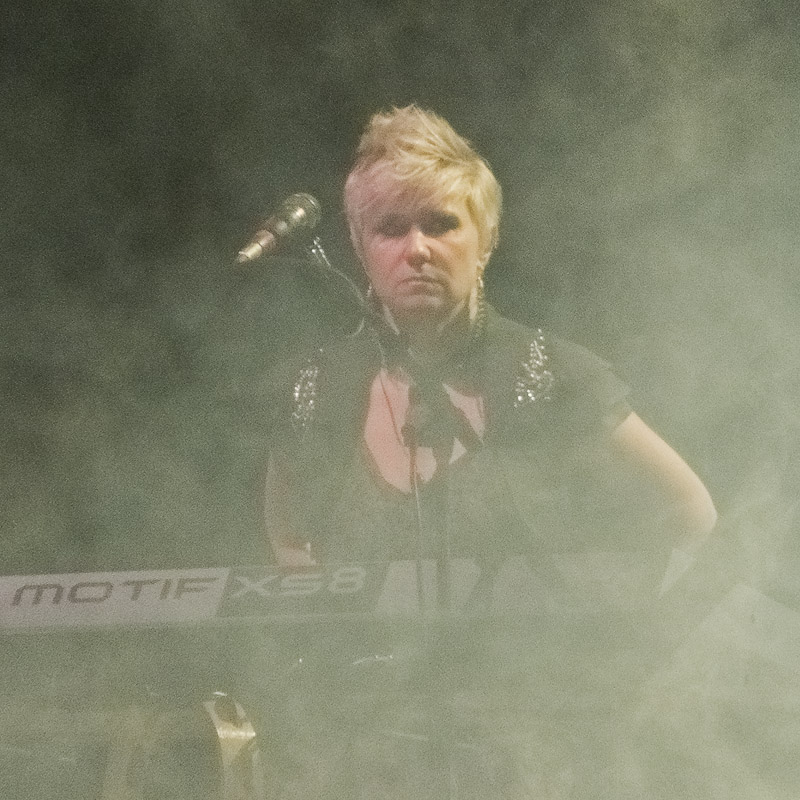
Here is a nice close up of Julie Ragins through the fog. She augments the vocals in the band, no doubt providing some of the missing high tones that Pinder once provided.
A nice shot here of the remaining original members of the modern version of the Moodies …
And another astoundingly clear image of John Lodge.
A terrific image of John with the band’s flautist, Norda Mullen and Julie Ragins at keyboards, who you saw earlier. Norda’s flute is every bit as nice as Thomas’s … but too bad she can’t sing some of the greats like “The Tide Rushes In” …
They went all pink for a while then and I concentrated on Justin for a bit …
These images with glow are part of my second series processed this evening. The early set were processed without any glow. I like this effect as it showcases the ethereal nature of their music.
A nice isolation shot of Justin and Graeme …
And one of John …
Here’s one that screamed for a black and white treatment and I like how it came out …
Here I caught Alan Hewitt napping for a moment … of course I am kidding. The camera often catches moments like this … I included it because I don’t have a lot of good images of Alan.
Here’s the best image I have of Gordon Marshall. He augments Graeme’s drumming and, truth be told, he does a whole lot of the tougher stuff. One must give Graeme a break though, as he turned 70 in March. Anyone able to withstand the rigors of touring at that age deserves a hat’s off …
Another superb capture of John …
A better shot of Alan …
And another of John …
And the originals in a nice group shot …
A nice shot of Gordon in action …
Julie in isolation with Norda in shadow in front …
Later in the concert, Graeme Edge came out from behind the drums and spoke. He recited the song “Higher and Higher”, which I believe was written by Graeme but originally spoken by Michael Pinder. Graeme did a great job though and even treated the audience with an amusing dance around the stage. It worked, and really well in my opinion.
At various times, the audience stood for them, but one must remember that the average age of the fans is a little up there :-)
Approaching the end of the concert, these guys are really turning it on …
This is a large subset of what I shot, but if you would like to see the whole series, then click here to go to my album.
Meanwhile, here is the tail end of Knights in White Satin, followed by the finale – Question – and the encore – Ride my See Saw” ….
A lot of people whine and moan about how bad the video is on the F550EXR. Well, this one is straight from the camera and it definitely does not suck. A little too much focus hunting, but it still manages to get them in focus at full zoom most of the time. And the sound is just as good as the sound on the ZS3 (which shot the opening video of the concert) … this is another thing that the F550 does better than any of the other EXR cameras as well …
And yes, I was able to defy “the man” and get this long recording because I simply posed as if I was not recording at all. This is why the video is not as smooth as the ZS3 video … for that one I could use proper hand holding technique but for this one I had to use stealthy technique, which pretty much sucks :-)
All in all, we had a very nice time. The Moodies were just great, despite the crappy turn out. I remain ashamed of the insult we gave them, but cannot help but be impressed that they gave us their all anyway … true professionals.
Ok, for those of you who do not get snow or ice in your region, please ignore this post. But for those who live where it snows and where ice can coat the roads now and again, shame on you if you try to go through winter without dedicated winter tires.
Here is the reasoning: Winter tires cost about $400 a set for many vehicles. That’s cheaper than almost anyone’s deductible, which means that if you slide off the road even once, you will have already saved money.
Further, dedicated winter tires have much better traction than any all season tire. They give you more confidence in bad weather and increase your odds of avoiding an accident. That reduces the odds of injury to you and yours or to others.
It’s common sense, and anyone who still chooses to cheap out and take the risk should be made to pay a severe penalty should someone be hurt or killed in an accident caused by their lack of traction. It is akin to playing Russian Roulette with random strangers without their consent. What exactly would be the penalty for that?
So now you’ve decided to get snow tires after all … excellent choice! So what brand? That answer is fairly easy. If you will be mainly in snow and ice, get the Michelin X-Ice. It continues to win the Consumer’s Report tests every year. But it’s not great on wet roads. So if you are going to be on wet roads pretty often (as we are in Ottawa all the time), then your choice should be the #2 tire the last few years running … the General Tire Altimax Arctic. This is the one I have on the CR-V and it is superb. Seriously good.
Other brands are also quite good of course … I like the Toyo G2 Observe, which is what I had before the Altimax. Very nice. I know people who Swear by the Bridgestone Blizzak. Anything you get will be vastly safer than running your summer tires in snow and ice.
What about tire and wheel size? Well, here it gets interesting. I searched the web and found that every credible reference is quite clear that you should drop a wheel size and increase side wall ratio to improve your traction. This follows the laws of physics, where narrower tires put more pressure on each square inch, thus pushing down through the snow for better contact with the surface underneath. Further, narrower tires do not have as much resistance against deep snow, in the same way that skates have less resistance than boots would when sliding forward.
Here is my example: my stock size on the Mazda 3 Sport is 205/55 R16. I priced some nice wheels (about $120 more than black steel wheels) -- I have found aluminum wheels more reliable long term, in that a slight dent on a steel wheel will vibrate, whereas the aluminum tends only to get gouged a bit – and the total package came to $728usd. Not all that bad for nice wheels and the best tires for my conditions.
Then I priced the 195/65 R15 tires, which are almost exactly the same diameter. I figured this out with the excellent tire size comparison calculator at the 1010TIRES.COM web site. Check that out here. The speedometer difference is that I would read 44/100ths of a percent slower. In other words, when going 100kph, the speedo would 99.5kph. Similarly, 60mph would show as 59.7mph. For any typical speedo with a needle indicator, that difference is invisible, period.
Here is the full data from 1010TIRES.
Here’s another hint from the Tire Rack web site. I chose the Mazda 3 – 4 door without TPMS so that I could select the 15” wheels. In later years, those just are not an option.
In 2011, the bottom one is the low end selection here in Canada. Also, my care is the GX model (lowest) and does not come with TPMS, which by the way saves me over $200 when buying new rims.
Anyway … the smaller tires are not only better in snow and ice than the larger, they are $100 cheaper. Go team! So the price is now $628 and I am much happier.
These tires cost only $76 per corner at this size. Versus $97 per corner at stock size. The shown wheels are also inexpensive at this size, being $79 per corner. These tempt me …
… but I am also a fan of the machined look instead of the painted look. For $2 per corner extra, I can grab these …
Tough call …
Final issue for Canadians. Should you order directly from TireRack and pay the very high shipping costs?
Ouch, and there is still the HST of 13% on top of the package and other fees.
Double ouch.
There is another option, which is to ship to Ogdensburg’s UPS Store if you are in and around Ottawa. Obviously, there will be similar arrangements near other major cities near the border. Anyway, this changes things considerably.
Now, if I drive down and pick these up myself, I know that I will pay the HST on the way back, plus $20 at the UPS Store for storage. That means about $846. Oops … add the provincial tire fee (disposal) and duty and you get something like $900 or so …
Well, that’s a pretty penny still. I could save another $150 or so by dropping to steel wheels, and I just might. But I really like this setup and will enjoy it for years to come. I tend to keep cars for 8 to 10 years, so we’re talking a small increment when divided that far.
Just to keep it real … the same smaller sized tire and and comparable rim set would approach $1200cad after all fees -- I just did the search and calculation – so I can ship to Ogdensburg and pay all fees and save $300. Not bad. Plus, Tire Rack does dynamic balancing while Canadian Tire does not. That may count for something (like finding tire flaws before shipping them out.)
Anyway … good luck. If you live in a snow bound area, please seriously consider this ounce of prevention.
Yeah, I have been disappearing again. Sorry about that. Too much to do lately … today was grass cutting, pool cleaning and tearing half the ceiling out of the kitchen. Sorry, but that stuff is winning the battle for my time.
However … Fuji will be sending me the X10 for review once it ships, so I will be able to put together some reviews and comparisons when that gets here …
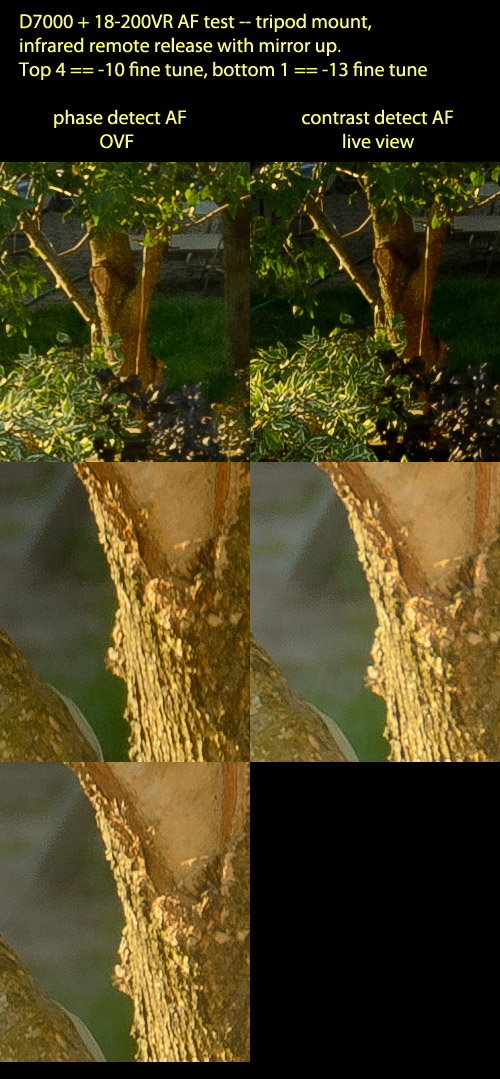
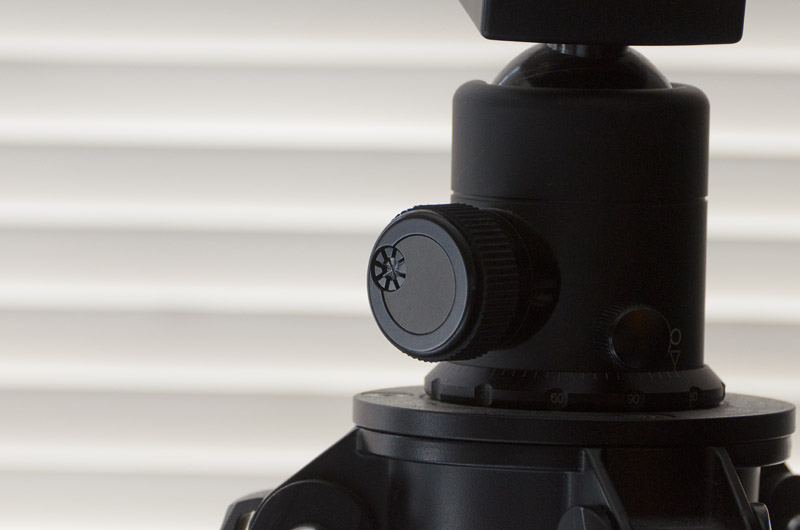
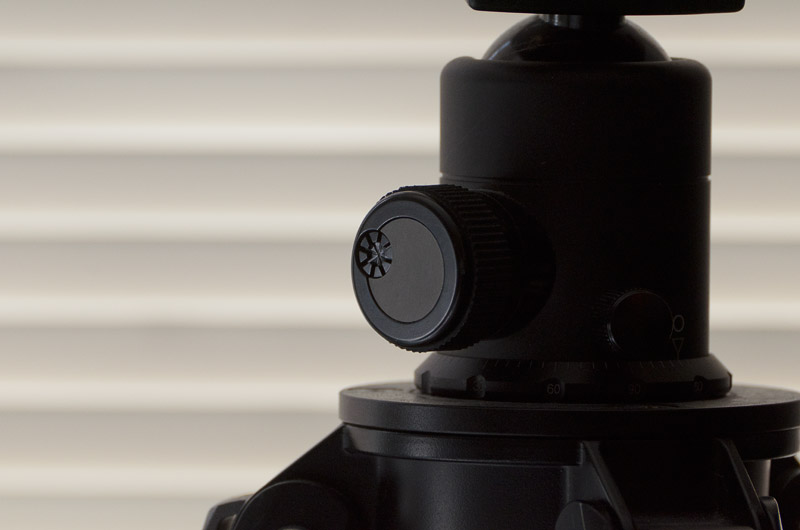
I tested the 70-300VR with the D7000 recently and this time I turned my attention to the 18-200VR, a lens that is difficult to fine tune because of its remarkable 11x zoom range. Yet it is worth the effort to get the lens as sharp as possible as it is my go to lens for walking around.
It is important to set the lens to its sharpest aperture for tests such as these. I use f/8, which is generally its best aperture. But frankly, this lens is decent from wide open through f/11 for typical snap shooting.
I also mount on tripod and release with the infrared remote in mirror up mode. In this way, I can click once to raise the mirror, wait 5 seconds or so for everything to settle, and then click again to expose the image. Works very well.
So here are the crops from my experiment. I started with the AF fine tune set to –10, a figure I arrived at by just fooling around with the camera for a few minutes. Then I shot a second long zoom image at –13 and found this to be tack sharp (or as close to that as this lens is able to do.)
These images are all processed in tandem in ACR, so there is no difference in processing to blur the results.
At –10 AF fine tune, the contrast detect was slightly sharper at 18mm and slightly less sharp at 200mm. This must, however, have been a statistical thing as I did forget to turn off VR.
No matter … I then slightly tweaked AF fine tune to –13 and found the image tack sharp. Wow ….
So I am satisfied that my 18-200VR is again the perfect travel companion. I can drag along my primes if I want even better results. Especially my MF 105mm 2.5 Ai (Afghan Girl lens.)
For those who are really worried about shooting the D7000 because of all the noise on the forums, you should consider whether you are willing to invest a bit of time in tweaking your skills and your camera. If you are, then I say jump at this thing … it is certainly good enough for me to sell off both the D300 and the D700 …
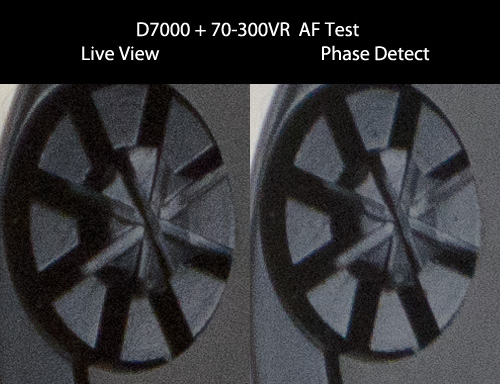
There is a thread running right now at DPReview regarding this issue. Someone tested the 70-300VR on the D5100, which is the next model down but with the same sensor. He was wondering how this lens handled the very high pixel density of the D7000.
He said he got a lot of blurry images, even though his D700 shot this lens perfectly. So I thought I would test it on my D7000, since my copy of this lens has been perfect on the D700 and the D300.
I also noticed (again) that the metering in live view appears to underexpose images considerably when compared with normal view through the OVF. I have no idea why, but perhaps the subject area is wider when in live view for whatever reason.
OVF with Phase Detect AF
That looks pretty sharp to me.
Live View with Contrast Detect AF
That also looks sharp. But the image is slightly magnified and is underexposed by a stop. No idea why, since I did not shift positions at all and I focused on the same spot.
Here are the 100% crops to show any difference in focus.
Very similar. The nod goes to contrast detect for the crisper edges. But this is an image at the equivalent of 46 inches wide … so this difference is not all that relevant. Of course, when shooting people with hair, this difference does make a difference if printing big. So fine tuning AF is worth the effort. In studio, though, I would be pretty tempted to focus using contrast detect in live view.
Bottom line is that my 70-300VR copy appears pretty good on this camera. If one is seeing blurred images, one should try it in live view with contrast detect focus. Precision over speed to test the lens.
Then try to adjust AF Fine Tune if there is a massive difference in focus between the two methods. The D5100 does not offer AF Fine Tune, so that would be a real problem if the lens will not AF. But this is still not a resolution issue.
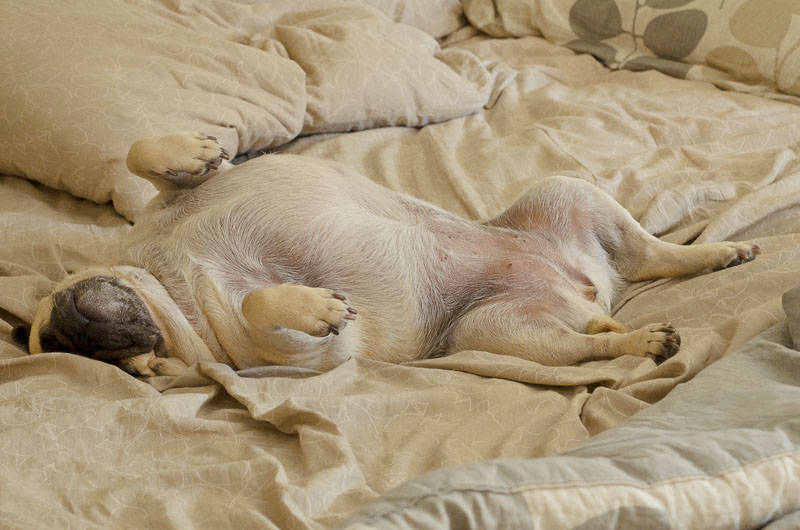
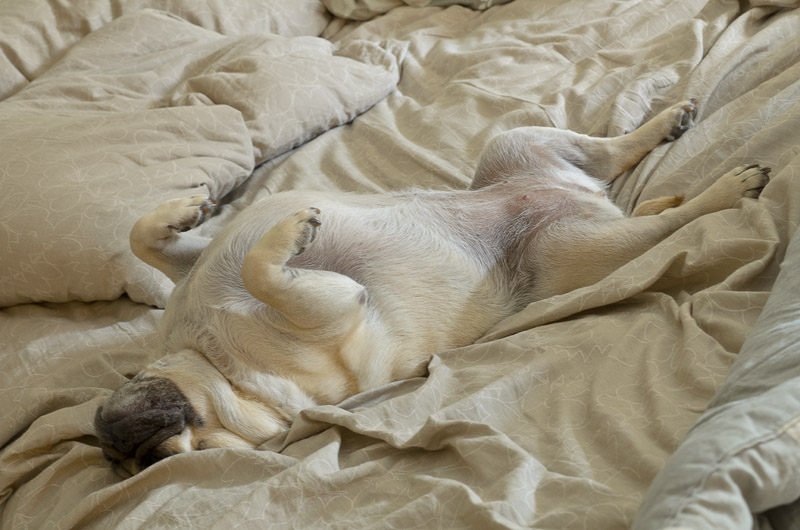
I have the privilege of having care of Sophie, Karen’s sweet Pug whom I have capture in numerous images over the years. I have her here from Thursday evening through Monday evening. She is very easy to get a long with and always quiet (until last night, when a rather violent scene on the tube got her barking like mad for a few moments.)
I take her outside several times a day and she is otherwise rather easily occupied. She even sleeps in, making life very easy on weekend mornings … here she is sawing it off at a quarter to 11am … and no, she did not go back to sleep here, she had not yet awoken :-)